This is a newly-constructed manual for Harvest Moon: Back to Nature. The existing manual is riddled with errors and omissions, which is what led me to design this one. Suggested resolution is 1024x768 or greater.
Farm Map
Your House
Planting & Harvesting
Raising Animals
Tools of Your Trade
The Village
Your Stamina
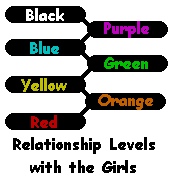
Making Relationships
Seasons
New to the game? No worries, this section will get you moving in the right direction!
Starting a New Game
Once the game's loaded up, press START to call up the menu, and select New Game. You'll want to have a MEMORY CARD with at least 4 blocks free as well, for saving your game later.
Enter Your Name

Pick what you want the villagers to call you. The maximum number of letters you can have is 8, so keep it short.
Enter your Birthday
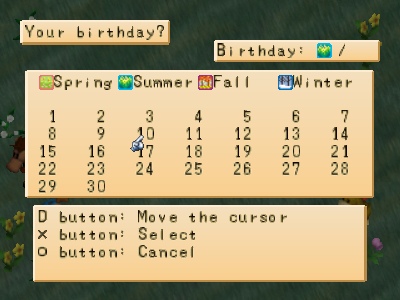
Here's where you pick when your birthday is. Sometimes you'll get postcards on your birthday from people who really like you.
Name Your Farm
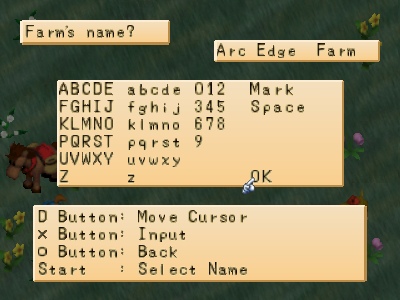
Now you choose what the farm will be called. As with your name, the maximum length is 8 letters.
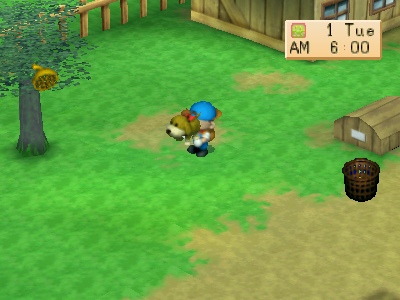
Name Your Dog
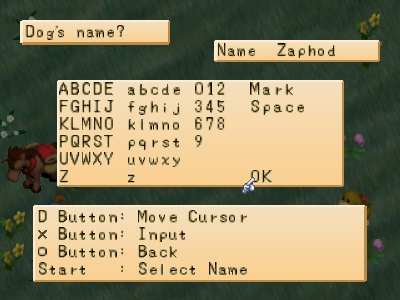
Of course, you don't start out with nothing at all! Pick a name for your canine companion, but remember that 8 letters is still the limit.
Start Farming!
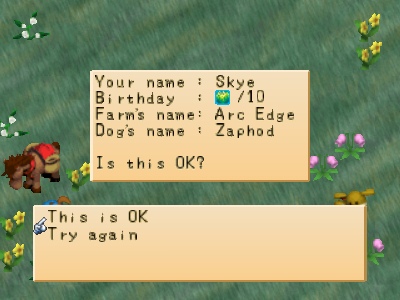
That covers everything, so if you like your choices, select This is OK to begin the game. If you want to change something, pick Try again. If you pick Try again, you'll have to re-enter everything, though.
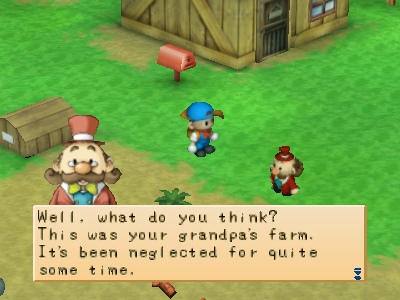 | Childhood is full of happy memories, like the one where you visited grandpa's farm, all those years ago. There was a girl in those memories, but maybe she was just a dream... Now that grandpa has passed on, the farm has been left to you, and all that you have to keep you going is that one memory. The farm is a mess, but the dream of restoring it drives you on. |  |
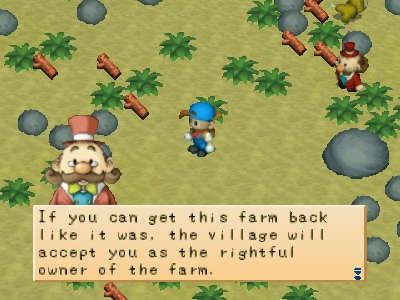
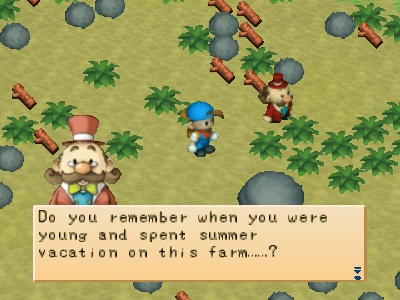 | The villagers are, of course, skeptical of what you can possibly do to restore your grandfather's old farm. They've decided to give you three years to prove your worth, at which point you'll either be allowed to stay, or get kicked out of town. It's your decision of how you plan to go about restoring the farm, but you'll have to get it done before the deadline hits. |   |
 | And thus it begins... | 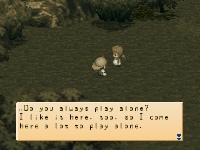 |
| L1 Button | Whistle for your dog |
| L2 Button | Whistle for your horse |
| R1 Button | Cycle between tools in the rucksack |
| R2 Button | Cycle between items in the rucksack |
 Button Button | View the rucksack; get more information on a menu option |
 Button Button | Cancel options; run while not in menus (hold down) |
 Button Button | Use equipped tool; eat item in hand |
 Button Button | Confirm menu choices; pick up and throw items |
| Directional Pad | Moves the cursor in menus; moves your character out of menus |
| START Button | Calls up the Main Status menu |
| SELECT Button | Calls up the Map Screen menu |
| ANALOG Mode Switch | Enables or disables analog control |
| Left Analog Stick | Moves the cursor in menus; moves your character out of menus |
These are the screens that you'll deal with on a regular basis while playing the game.
Main Screen - The game takes place here.
1 - Your character - Self-explanatory.
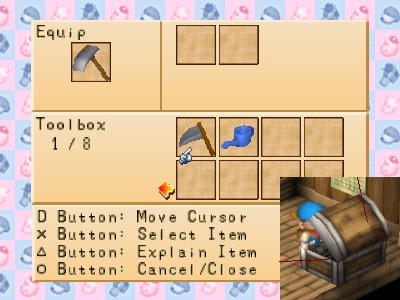
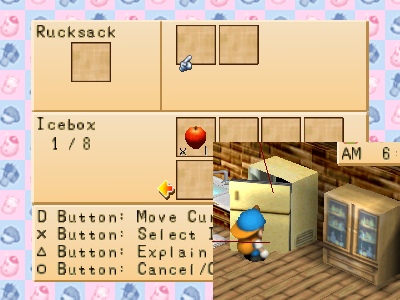
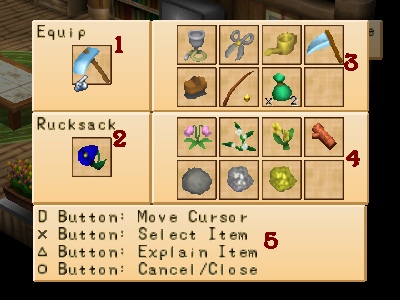
Rucksack - This is where you'll find your inventory.
1 - Current tool in hand - This is the tool you'll use if you hit
Map Screen - This will let you track things down.
1 - You are Here icon - This is your current location on the map, roughly.
Press SELECT to call up the farm map. See Farm Map for details.
Main Status - The first screen of the status subscreen.
1 - Farm name - What your farm is called. See Getting Started for details.
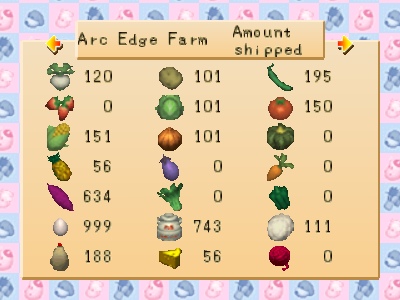
Harvest - This is the list of what you've shipped. Very self-explanatory.
Livestock - These are the subscreens for chickens, cows, and sheep.
1 - Chicken picture - This will tell you if a chicken is a chick, healthy, or sick.
1 - Cow picture - This will tell you if a cow is immature, healthy, or sick.
1 - Sheep picture - This will tell you if a sheep is immature, healthy, or sick.
Helpers - These are the available Harvest Sprites.
1 - Helper's name and face - Self-explanatory.
Tools - These are your tools and their power levels.
1 - Progress bar - How much mastery you have over a tool.
Earnings - This is an overview of your earnings over the last year.
1 - Earnings - How much you've made so far this season
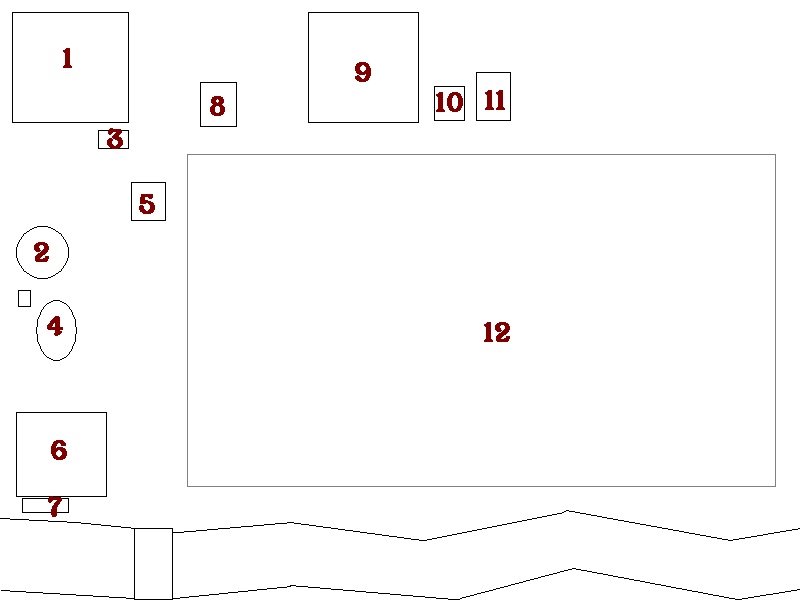
This is a map of the farm, obviously.
1 - Your house - This is where your day begins, and where you can store tools (and other goods once you've upgraded it).
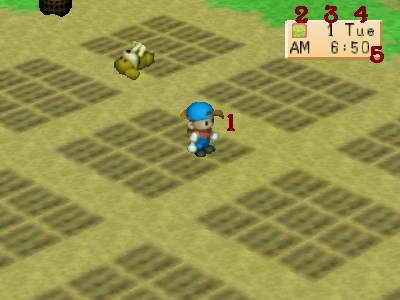
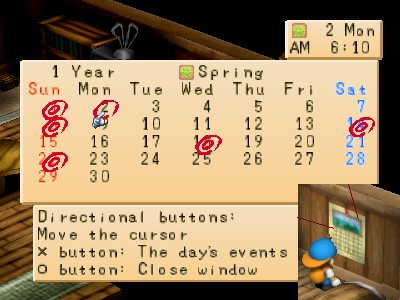
2 - Current season icon - Self-explanatory; each season has 30 days.
3 - Current day of season - Self-explanatory.
4 - Current day of week - Self-explanatory; Saturday and Sunday are listed in blue and red, respectively.
5 - Current time - Self-explanatory.
 on the main screen.
2 - Current item in hand - This is the item you're holding right now. Pressing will cause you to throw it while in the main screen.
3 - Tools in rucksack - These are the other tools you have on hand.
4 - Items in rucksack - These are the other items you have in your rucksack.
5 - Help window - This is where you'll see descriptions of items if you press while the cursor is on them.
2 - Dog is Here icon - This is your dog's current location on the map, roughly.
3 - Help window - This will give you a description of any location you press on.
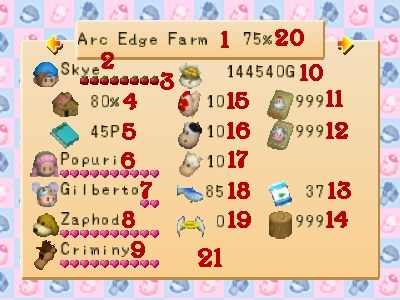
2 - Player name - What your character is called. See Getting Started for details.
3 - Power Berries - How many Power Berries you have. Power Berries boost stamina, allowing you to work longer.
4 - Farm building completion score - How many expansions you have to the farm, in percentage form.
5 - Recipe book pages - Total number of successful new recipes made.
6 - Wife's name and affection - Self-explanatory; won't appear until you're married.
7 - Child's name and affection - Self-explanatory; won't appear until you have a child.
8 - Dog's name and affection - Self-explanatory; see Getting Started for details.
9 - Horse's name and affection - Self-explanatory; won't appear until you have a horse.
10 - Current funds - How much money you have on hand right now.
11 - Current chicken feed - How much feed you have for chickens.
12 - Current livestock fodder - How much fodder you have for cows and sheep.
13 - Current fish food - How much food you have for the fish pond.
14 - Current lumber - How much wood you have stored in the lumber shed.
15 - Total chickens owned - Self-explanatory.
16 - Total cows owned - Self-explanatory.
17 - Total sheep owned - Self-explanatory.
18 - Total fish owned (in pond) - Self-explanatory.
19 - Total number of animals that have died on the farm - Self-explanatory.
20 - Farm completion score - How complete the game deems your farm. Not used at all in terms of winning the game.
21 - If you ever catch any legendary fish, a small picture of the fish you've caught will show up down here.

2 - Chicken name - What you've named a chicken.
3 - Chicken affection - How much the bird likes you; the more affection, the better the eggs.
4 - Chicken age - How old the chicken is; just for reference.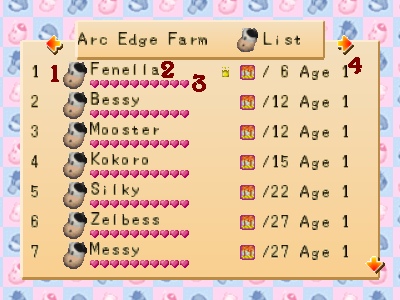
2 - Cow name - What you've named a cow.
3 - Cow affection - How much the cow likes you; the more affection, the better the milk.
4 - Cow age - How old the cow is; just for reference.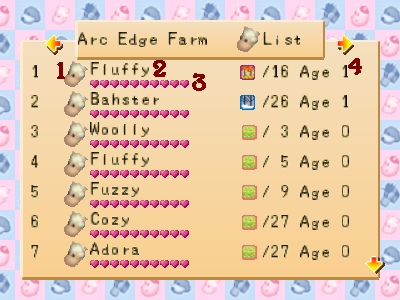
2 - Sheep name - What you've named a sheep.
3 - Sheep affection - How much the sheep likes you; the more affection, the better the wool.
4 - Sheep age - How old the sheep is; just for reference.
![]()
2 - Helper's affection - How much the Harvest Sprite likes you. The more a Sprite likes you, the more likely he is to offer to help.
3 - Current job - An icon representing the current task the Sprite is assigned to.
4 - Days left - How many more days a Sprite has left of doing a given job.
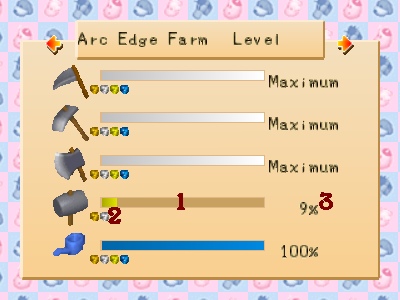
2 - Ore icons - What level(s) you can upgrade a tool to.
3 - Percentage - How much mastery you have over a tool in relation to its current level.
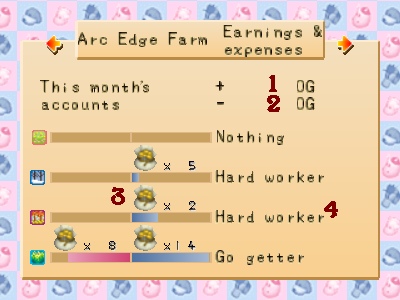
2 - Expenses - How much you've spent so far this season
3 - Season earnings overviews - A brief overview of the last 4 seasons' profits.
4 - Season earnings description - The game's outlook on a given season's profits.
2 - Apple tree - This little tree will produce 3 apples per day during Fall. It's also a good spot for a beehive...
3 - Mailbox - You'll find various announcements and greetings here. Any mail left unread for 30 days is removed from the mailbox automatically.
4 - Fish pond - This is where you can raise fish, and there's even a bin next to it for fish food. You can also draw water from this pond for watering crops.
5 - Shipping bin - Place crops and other sellable goods in this to sell them. The shipper stops by daily at 5:00PM to empty it, and you can also use the shipping bins in the barn and chicken coop.
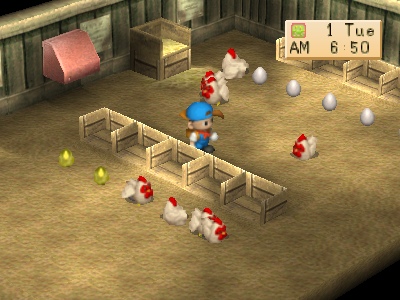
6 - Chicken coop - Your poultry lives here. It starts out being able to hold 5 chickens, and can be expanded to hold 10.
7 - Water mill - Can be used to make Chicken Feed out of Corn. 1 Corn = 10 Chicken Feed.
8 - Doghouse - Mostly decoration. Feel free to ignore it.
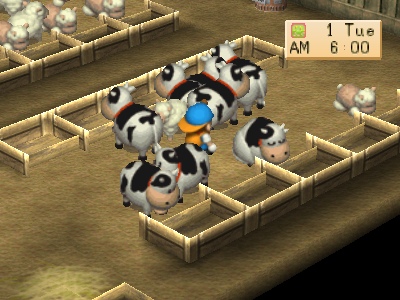
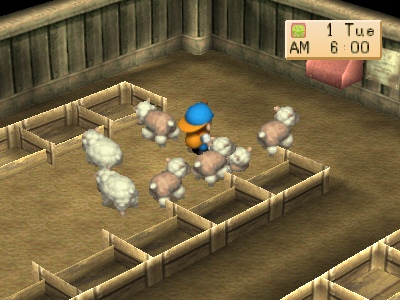
9 - Barn - This is where livestock is raised. It can hold 10 cows and/or sheep at first, and can be expanded to hold 20.
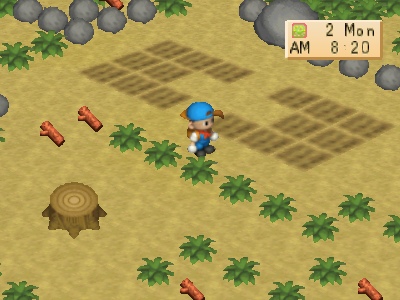
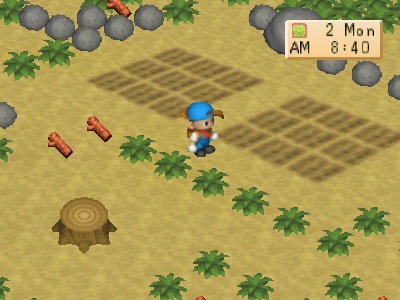
10 - Wood shed - This is where lumber is sent automatically when you cut wood. You can use lumber for fences and expansions.
11 - Stable - Your horse lives here. Keep him inside the stable during bad weather.
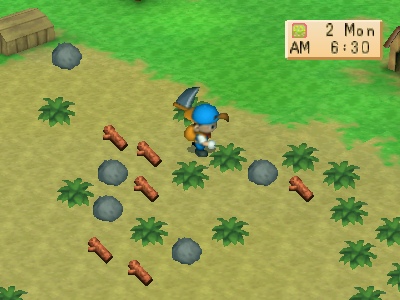
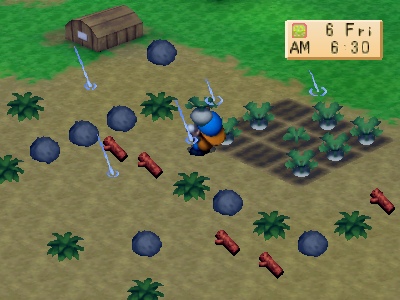
12 - Field - Were the crops are sewn and reaped. You'll have to clear it up to use it.
| Seeds | Name | Crop | Season | Buy Price | Sell Price | Grow Time | Regrow? | Rank |
 | Turnips |  | Spring | 120G | 60G | 5 days | No | #7 |
 | Potatoes |  | Spring | 150G | 80G | 8 days | No | #11 |
 | Cucumbers |  | Spring | 200G | 60G | 10 days | 6 days | #12 |
 | Cabbages |  | Spring | 500G | 250G | 15 days | No | #4 |
 | Strawberries |  | Spring | 150G | 30G | 9 days | 6 days | #14 |
 | Tomatoes |  | Summer | 200G | 60G | 9 days | 4 days | #8 |
 | Corn |  | Summer | 300G | 100G | 15 days | 4 days | #6 |
 | Onions |  | Summer | 150G | 80G | 9 days | No | #13 |
 | Pineapples |  | Summer | 1000G | 500G | 21 days | 6 days | #2 |
 | Pumpkins |  | Summer | 500G | 250G | 15 days | No | #4 |
 | Eggplants |  | Fall | 120G | 80G | 10 days | 4 days | #3 |
 | Carrots |  | Fall | 300G | 120G | 8 days | No | #5 |
 | Sweet Potatoes |  | Fall | 300G | 120G | 6 days | 3 days | #1 |
 | Green Peppers |  | Fall | 150G | 40G | 8 days | 3 days | #9 |
 | Spinach |  | Fall | 200G | 80G | 6 days | No | #10 |
 | Orangecup Fruit |  | Hothouse | 1000G | 60G | 9 days | No | #15 |
| Sickle | Hoe | Ax | Hammer | Watering Can |
 |  |  |  |  |
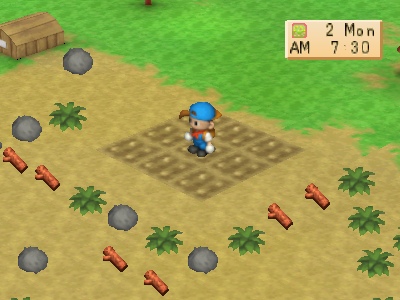
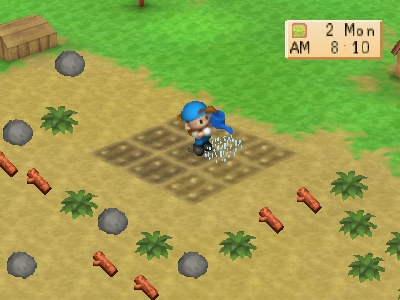
| This tool is, of course, used to cut down grass and weeds. It can also cut down crops, so be careful about using it! | Used to plow dirt, so that you can plant seeds. You can also use it to get rid of seeds on tilled soil if you decide you don't want them there. And finally, it can be used to dig in the mines. | You can cut branches up to make lumber with this tool, and once it's been upgraded, it can cut down tree stumps, as well. | The hammer's primary purpose is to break rocks, though it can also be used to un-till soil. Once the hammer is copper, it can break larger rocks, and once it's silver, it will be able to tackle the large, misshapen rocks strewn about the field. | The watering can is the only way to get water to your crops, short of hiring the Harvest Sprites to water for you. Refill it at any place where there's fresh water. |
Other Tools
These are just a few of the tools you'll find during the course of the game. Others exist, so keep an eye out for them!
| Rucksack | Basket | Brush |
 |  |  |
| The rucksack lets you tote around items. It starts out pretty small, but you can buy a better one at the Supermarket, and an even better one than that a bit later. | The basket lets you carry up to 30 crops around in it for shipment. This can really speed up the harvesting process. | Your horse loves to be brushed, and you'll need this to brush him. Saibara sells it. |
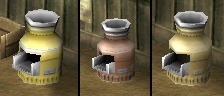
| Milker | Clippers | Fishing Rod |
 |  |  |
| The Milker lets you draw milk from matured cows. You can buy it from Saibara. | Clippers let you gather wool from sheep. You can buy them from Saibara. | If you ever want to start a fish pond (or just need a fish for a recipe), you'll need this to catch them. Greg the fisherman has this, and he'll gladly give it to you if you ask him for it. |
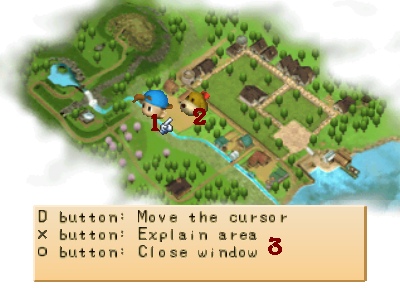
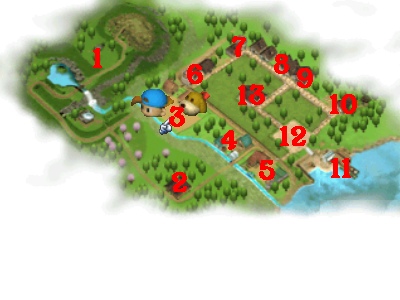
Mineral Town is no small place, despite appearances. Here's an overview of the various areas of the valley.
1 - Mother Hill - At the base is a hot spring, a mine, and a waterfall. Further up the mountain is a lake and a natural flower garden, and at the peak is the best view for miles around!
2 - Woodcutter's House - This is where Gotz lives. He's the man to talk to if you ever need to upgrade a building, or if you just need spare lumber. Open 11:00AM to 5:00PM on weekdays, closed on the weekends.
3 - Your Farm - This is your base of operations, of course! Set on the outskirts of the village, but right in the middle of the valley, it makes a fine hub for getting to just about anywhere.
4 - Chicken Lil's - The poultry farm here sells chickens, feed, and animal medicine. Stop by if you need to stock up! Open from 11:00AM to 4:00PM daily, but closed Sundays.
5 - Yodel Ranch - Barley runs this place, and sells cows, sheep, fodder, and various tools to help with taking care of livestock. He's the man to see if you want to fill your barn up. Open from 9:00AM to 3:00PM every day but Monday.
6 - Blacksmith and Winery - Saibara the blacksmith works here, and he will upgrade your basic tools and sell you new tools... for a price. Open from 10:00AM to 4:00PM every day but Thursday. The Aja Winery is right next door, where you'll find grape beverages for sale. Open from 9:00AM to 12:00PM daily, closed Saturdays.
7 - Library - A useful source of information, the library is run by the shy Mary. Open 10:00AM to 4:00PM daily, closed Mondays.
8 - Supermarket - Your one-stop shop for seeds, ingredients, and storage mediums. Expect to become a regular customer here! Open 8:00AM to 6:00PM every day but Tuesday and Sunday.
9 - Clinic - If you're ever feeling ill, or in need of medicine to chase off sickness, stop by the clinic and get some first aid. Open 9:00AM to 6:00PM daily, closed Wednesdays.
10 - Church - Though there's not much to do here, you can confess your sins at certain times. You may get married here some day. Open 10:00AM to 5:00PM daily.
11 - Mineral Beach - The hottest hangout during the summer, and a fine place to fish. Kai runs a concession stand here during the summer, from 8:00AM to 11:30AM, and 1:00PM to 5:00PM.
12 - Rose Square - Festivals are held here most of the time. If it's a holiday, this is probably the place you need to be!
13 - Inn - Doug runs his inn here at the heart of the village. Stop in for a quick meal some time, or kick back and talk with the local patrons. Open from 8:00AM to 9:00PM daily.
Not only is time working against you, but your body has its limits, as well. As you work, you drain your stamina, and eventually you'll start to get fatigued.
Stamina and Fatigue
Stamina will drop as you use tools, and once you're out, fatigue will begin to raise. You can get a general idea of how much energy you have left by the pantomimes your character makes as he continues to work. It's a good idea to take a break before your fatigue gets too high, because if it does, you might get sick and lose the rest of the day!
If you don't recover from fatigue, it can lead to bad things. Most notably, you can pass out if you let your fatigue get too high. If you just let it get moderately high, you might end up starting the next day later than usual. Deal with fatigue before it becomes a problem.
When it's raining or snowing, you'll get fatigued even before your stamina has run out. This means that you can't work as long during bad weather, but fortunately, you won't have to. When it rains, your crops are watered for you, after all.
Restoring and Increasing Stamina
The second method to deal with stamina drain is to eat something, be it crops, food you've made, or pre-made dishes from one of the shops in town. You can also use Bodigizer and Turbojolt medicine to heal up (Bodigizer restores stamina, while Turbojolt recovers from fatigue).
Increasing your energy is a very good idea, and something you should aim to do. Power Berries, mystic fruit from a legendary tree, raise your stamina by a bit, allowing you to work longer. There are 10 of them in the Mineral Valley area, so you may want to find them all. There's also a secret berry that has mysterious and wonderful effects...
If you're running low on energy, there's a few ways to recover. The simplest way is to take a dip in the hot springs. Their potent healing powers can recover your energy completely in 50 minutes at the start of the game, and they help ease fatigue as well.
| 1 New Year's Day | 2 Louis' Birthday | 3 | 4 Bold's Birthday | 5 | 6 | 7 |
| 8 Goddess Festival | 9 | 10 | 11 Saibara's Birthday | 12 | 13 | 14 Spring Thanksgiving |
| 15 Staid's Birthday | 16 Elli's Birthday | 17 Barley's Birthday | 18 Local Horse Race | 19 Lillia's Birthday | 20 Elli's Birthday* | 21 |
| 22 Cooking Festival | 23 | 24 | 25 | 26 Aqua's Birthday | 27 | 28 |
| 29 Greg's Birthday | 30 Sasha's Birthday |
| Item | Value | Location(s) |
| Bamboo Shoot (3) | 50G | Hot Springs area |
| Blue Grass (2) | 100G | Hot Springs area, Gotz' house |
Tips for Spring
Since you'll either be new to the farm or recovering from winter, it's a good idea to plant early. Don't forget to forage, too; an extra 350G a day can add up quick. If the profits just aren't cutting it, a bit of mining may be in order, too.
New Year's Day (Spring 1)
Though you can't attend it the first year, the New Year's celebration takes place every year in the Square, as well as at the Inn.
Goddess Festival (Spring 8)
A dancing event, it's traditional for boys to ask their girlfriends to come with them to it on the day before the dance. Don't expect to have a date for this festival the first year.
Spring Thanksgiving (Spring 14)
Show your appreciation for the girls of the village, and bake them cookies today.
Local Horse Race (Spring 18)
The stakes are up, and the betting is rampant! Though you cannot participate the first year beyond gambling, you may one day be the winner of this equestrian challenge!
Cooking Festival (Spring 22)
This contest is a good chance to show off your cooking prowess. Of course, you need a kitchen to stand a chance.
Summer
Summer marks the start of the bulk of the growing season. Things start taking longer to grow, but are worth more. And there are a lot more competitive festivals during this season, too.
| 1 Opening Day | 2 | 3 Popuri's Birthday | 4 Harris' Birthday | 5 | 6 Cliff's Birthday | 7 Sumo Chicken Festival |
| 8 | 9 | 10 Popuri's Birthday* | 11 Basil's Birthday | 12 Tomato Festival | 13 | 14 |
| 15 | 16 Timid's Birthday | 17 Ann's Birthday | 18 | 19 | 20 Cow Festival | 21 |
| 22 Kai's Birthday Ann's Birthday* | 23 | 24 Fireworks Display | 25 Thomas' Birthday | 26 | 27 | 28 |
| 29 Zack's Birthday | 30 |
| Item | Value | Location(s) |
| Red Grass (2) | 100G | Hot Springs area, Gotz' house |
Tips for Summer
You should definitely cut down withered Spring crops immediately, and start planting summer crops as soon as possible. Since crops take so long to grow during this season, you'll be left to mining and fishing as your only source of profit for most of the early part of the season.
Opening Day (Summer 1)
This challenging swimming contest opens up the season every year. The trick to winning is timing, not speed.
Sumo Chicken Festival (Summer 7)
A great chance to show off how strong your prize hen is. You can urge your hen on in this contest, but you should keep an eye on the ring while doing so. Urging your hen out of the ring will just cause you to lose.
Tomato Festival (Summer 12)
What could be more fun than tossing food around? Join a team and make some ketchup on your opponents' faces!
Cow Festival (Summer 20)
Got a cow that's happy? Enter them in this contest, and they just might make best of show!
Fireworks Display (Summer 24)
View the fireworks from Mineral Beach, as the season is brought to a close with a bang.
Fall
The growing season hits its peak during this, the harvest season. Everything grows fast and regrows even faster. Festivals are plentiful, and more laid-back than summer.
| 1 | 2 Gotz' Birthday | 3 Music Festival | 4 | 5 Stu's Birthday | 6 | 7 |
| 8 | 9 Harvest Festival | 10 Hoggy's Birthday | 11 Manna's Birthday | 12 | 13 Moon-Viewing Day | 14 Chef's Birthday |
| 15 Karen's Birthday | 16 | 17 Doctor's Birthday | 18 | 19 | 20 Carter's Birthday | 21 Sheep Festival |
| 22 Anna's Birthday Karen's Birthday* | 23 | 24 | 25 | 26 | 27 Rick's Birthday | 28 |
| 29 | 30 |
| Item | Value | Location(s) |
| Mushroom (4) | 70G | Hot Springs area, Gotz' house, Mother Hill |
| Poisonous Mushroom | 100G | Gotz' house |
| Wild Grapes (2) | 50G | Mother Hill |
| Truffle | 500G | Mother Hill |
| Green Grass (2) | 100G | Hot Springs area, Gotz' house |
Tips for Fall
As with Spring and Summer, plant early and you'll reap the benefits later. Since crops grow so fast during this season, it's to your advantage to plant as many of the more valuable crops as you possibly can.
Music Festival (Fall 3)
Welcome autumn with a night of music. Held at the Church, you can participate in this festival yourself. Just be sure you're on time!
Harvest Festival (Fall 9)
To celebrate the season's yield, the villagers all have a hot-pot meal in the Square. Come and participate, but don't come empty-handed!
Moon-Viewing Day (Fall 13)
Go to the top of Mother Hill and view the harvest moon in all its glory with the girl that likes you best.
Sheep Festival (Fall 21)
Here's your chance to show off your happy sheep. If your sheep is happy enough, it could be the winner of the year!
Winter
The season of rest, Winter is the ideal time to tie up loose ends that the growing season didn't allow you to tend to before. It should prove a welcome change of pace compared to the frantic growing seasons.
| 1 | 2 Kano's Birthday | 3 | 4 | 5 | 6 Gray's Birthday | 7 |
| 8 | 9 | 10 Dog Race | 11 Doug's Birthday | 12 | 13 Ellen's Birthday | 14 Winter Thanksgiving |
| 15 Duke's Birthday | 16 | 17 | 18 | 19 Won's Birthday | 20 Mary's Birthday | 21 |
| 22 Nappy's Birthday | 23 | 24 Star Night Festival | 25 Mary's Birthday* | 26 May's Birthday | 27 | 28 |
| 29 Jeff's Birthday | 30 New Year's Party |
Nothing to forage in winter
Tips for Winter
Winter is a good time to stock up on lumber, as well as mine for rare ores and upgrade things that you didn't have time to upgrade during the growing season. Since you need livestock to make a steady profit during this season, the first winter will probably be fairly rough on you.
Dog Race (Winter 10)
Show the town just how much your dog loves you, and how well-trained he is! But don't expect to win just because he loves you; your pup needs to know your scent, too!
Winter Thanksgiving (Winter 14)
To show their appreciation for you, girls will give you chocolate today. Just one more incentive to make friends with the village girls!
Star Night Festival (Winter 24)
If you ask a girl on the 23rd, she may invite you over to have dinner with her family on this day.
New Year's Party (Winter 30)
Ring out the old and ring in the new! Go to the peak of Mother Hill at midnight, and join in to watch the first sunrise of the year.
* - If your birthday coincides with one of the eligible girls' normal birthday, they will have their birthday on this day instead.
With that, you should be ready to begin your own Harvest Moon experience! Good luck, and have fun!
Version Beta (16 March 2004)
Version 1.00 (16 March 2004)
Version 1.10 (17 March 2004)
Version 1.11 (17 March 2004)
Version 1.12 (23 March 2004)
Version 1.13 (24 March 2004)
Game Design Credits
MARUCOME/Victor Interactive Software
Directors
Programmers
Designers
Composer
Debugger
US Executive Producers
US Product Managers
US Localization Managers
Special Thanks to
Character Design
Director
Original Game Design
Character CG
System Graphics
Special Thanks to
Producer
Executive Producer/
(c)2000 Natsume Inc.
Original Manual Design
New Manual Design
New Manual Contributors
You can find archival scans of the original manual in 256-color PNG format here.
* First public release of the manual
* Some images and data missing
* First finalized version of the manual
* All sections and images completed
* Manual Update Log section added
* Design Credits section added
* Added shop hour data to The Village section
* Added detailed options data for the bookshelf in the Your House section (thanks to Laserion for suggesting this)
* Correction of various typos and spelling errors
* Made a few minor changes (none of which are particularly of note)
* Added Back to Top links
* Added link to the Portal page of the site
Masayuki Kisaki
Teru Kurouta
Rouge Kaizuke
Magoichi Oritake
Syou Kondo
March
Katsumi Takatsuki
Katsura Design
Mitsuharu Okanomoto
Yuki Ya
Miyuki Homareda
Dai Kondo
Kiro Maekawa
Natsume Inc.
Graham Markay
Natsume Inc.
Sachiko Yamauchi
Natsume Inc.
Masahiko Yoshizawa
Victor Interactive Software Inc.
Matsuyama Igusa
Victor Interactive Software Inc.
Creative Staff
Yasuhiro Wada
Setsuko Miyakoshi
Tomomi Yamatate
Shinichi Hayakawa
Shunosuke Ozaki
Noriaki Kajimoto
Hiroshi Inoue
Takashi Ueda
Hikaru Nakano
Yasuhiro Wada
Victor Interactive Software Inc.
Seiichi Kizu
(c)1999, 2000 MARUCOME, Victor Interactive Software Inc.
Manual Design Credits
Natsume Inc. and Victor Interactive Software Inc.
Sky Render
Laserion
Harvest Moon: Back to Nature and its manual are (c)1999, 2000 MARUCOME, Victor Interactive Software Inc., and Natsume Inc.
Original Manual Scans